|
Images from linked group entities can be included in the report by selecting a linked screen shot cell range in the spreadsheet. The image can be in black & white, gray scale or in color, as shown in the screen. The background color can be forced to white as in a plotted drawing. The image can be aligned horizontally and vertically aligned to the left, right or center of the linked cell range. Before taking the screenshot a zoom factor and a percentage border increase can be applied to center the entities in the screen and increase image resolution. A delay in seconds can be specified if the images are not captured correctly. The name of the linked entity screenshot can be edited by selecting the screenshot node and then left clicking on it to activate the editing mode.
.png)
1. Set range address button. When this button is selected, the Report Template Explorer window disappears and the linked cell range were the image will be displayed can be selected in the Report Template Editor spreadsheet. Information in the section above this button will be updated with the worksheet name and the address of the range selected.
2. Cell copy options. Linked cell range row heights and column widths can be kept if more than one screenshot is taken.
|
.png)
3. Color conversion. Image can be black and white, grayscale or as shown in screen.
4. Force background color to white. Existing background screen color will be replaced with white in the final image.
|
.png)
5. Horizontal image alignment. Image can be positioned horizontally centered, or to the left or right inside the selected cell range.
6. Vertical image alignment. Image can be positioned vertically centered, or at the top or bottom inside the selected cell range.
|
|
.png)
7. Percentage border increase when capturing object extents. The drawing entities bounding box extents can be increased to show more detail around the image.
8. Delay in seconds between screenshots. If the images are not properly taken because of complexity, the time delay between each screenshot can be extended.
9. Take screenshots of grouped objects. Screenshots can be taken of all drawing entities in the group or processing each one separately.
10. Zoom to object: The drawing entities extents will be centered in the screen and the zoom factor applied. If this option is not checked no zoom will be performed.
11. Zoom factor: Values less than one will zoom out from the drawing entities extents. Values more than one will zoom in on entities. A value equal to one will zoom to drawing entity extents after applying the percentage border increase.
|
Tip: If image detail and resolution is important, check the zoom to object option and apply a zoom factor equal to or greater than one. If the zoom to object option is not checked, the screenshots will be taken faster but the image resolution and detail will be generally poorer.
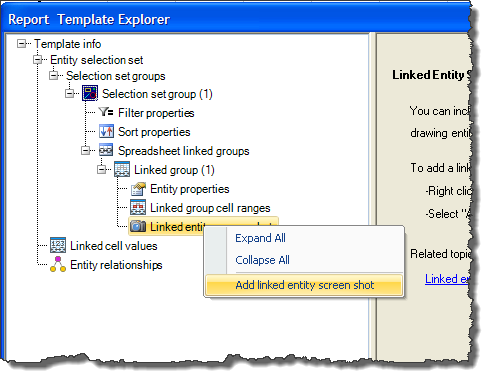
How to add a linked entity screenshot
1. Right click on the 'Linked entity screenshots' node.
2. Select 'Add linked entity screenshot' from the context menu
3. Select the cell range in the Report Template Editor spreadsheet where the image will be shown. To select a cell range pick a corner and keeping the left mouse button pressed drag to the range extents.
.png)
4. Press the OK button in the 'Select cell range address' dialog box.
Examples of screenshot settings
|
.png)
Fig. 1: Screenshot taken with zoom to object option checked and zoom factor equal to 1X, percentage border increase equal to 0%. View is zoomed to object extents.
|
.png)
Fig. 2: Screenshot taken with zoom to object option checked, zoom factor equal to one and percentage border increase equal to 20%. More detail is shown around the house block.
|
|
.png)
Fig. 4: Screenshot taken with zoom to object option unchecked, percentage border increase equal to 20%. Resolution is poor because the view was not enlarged before the screenshot was taken.
|
.png)
Fig. 5: Screenshot taken with zoom to object option checked, zoom factor equal to 2X, percentage border increase equal to 0%. The house block is not fully visible because the zoom factor applied was greater than 1X.
|
|
.png)
Fig. 6: Screenshot taken with zoom to object option checked and zoom factor equal to 1X, percentage border increase equal to 50%. Color mode grayscale, background color forced to white.
|
.png)
Fig. 7: Screenshot taken with zoom to object option checked and zoom factor equal to 1X, percentage border increase equal to 50%. Color conversion none (as shown on screen). Background color forced to white.
|
|